Today I’d like to introduce a project I’ve been meaning to start for a long time. Gamecube Project is an ongoing attempt to research the differences between PC (2004) and Gamecube versions of SADX, and implement them as a mod for the PC version. While this mod will be nowhere near as ambitious and fast-progressing as Dreamcast Conversion, I’d like to release the first version of the mod to get started.
Download (SADX Mod Loader 1-click install)
(This mod isn’t compatible with Dreamcast Conversion. You can’t load both mods at the same time).
Although I’ve been contemplating it for a while, there were many technical difficulties in getting this off the ground. Here’s a list of steps we’ve made over the years before this project could exist:
- SonicFreak94 developed a mod that makes the lighting in SADX PC more Gamecube-like. I made an experimental fork of this mod with some attempts to improve accuracy.
- Exant and hesoyaam figured out REL file compression in the final version of SADX GC, and I integrated it into SA Tools.
Edit: It was pointed out to me that this post doesn’t mention that REL compression was figured out by RikuKH3 first. This is indeed true. REL compression was first figured out by RikuKH3, who got a commission to make a tool to decompress REL files for a Russian translation project. Since RikuKH3’s tool was closed source, we needed a better long-term solution for SA Tools. The SACompGC library linked above is based completely on decompiled code from the Gamecube version of SADX. However, the Russian translation mod also included a hacked DOL file that bypassed compression to enable the game to load uncompressed REL files. Exant compared that hacked DOL file with the original to find the relevant code to decompile. - I did some initial research on GCAX soundbank formats used in Gamecube versions of SADX, SA2B, Heroes, Shadow and Billy Hatcher.
- I mapped out the data in SADX GC (with contributions by End User) and created a template for SA Tools to be able to extract it.
- To make a direct comparison possible, I matched up the data with filenames we got from X360 symbols like I did earlier with the PC and DC versions.
- I wrote a comparison tool that lists differences in levels and models and generates C++ code to patch the PC models to match the GC version. This patcher was first used in Dreamcast Conversion, but it was originally developed for Gamecube comparisons.
- Exant, Kell and I implemented support for Gamecube GVM files in the Mod Loader.
The last one in particular addressed a major roadblock because I wanted to use original GVM textures rather than texture packs. Thanks to Exant and Kell it is now possible.
Now let’s discuss the actual differences between SADX PC and SADX Gamecube. Unlike the Dreamcast version, there are no major design differences, and most of the changes can be explained by technical factors rather than artistic choices. Some differences are easier to notice while others are more subtle, but I’ll try to cover all of them.
Lighting
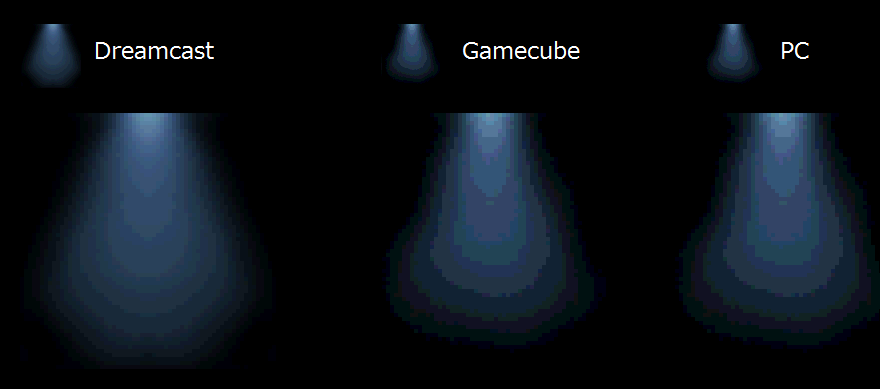
The lighting in the Gamecube version often looks pretty different from the PC version. There are several reasons for these differences:
- While both versions use the same format of lighting data, the PC version uses that data to set up Direct3D lights, while the Gamecube version uses a custom lighting formula that applies diffuse lighting last, which makes the environments look more vibrant.
- For character and object lighting, the Gamecube version generates palettes and applies them per-pixel, while the PC version uses only some of the values to set up Direct3D lights, which look different either way. The Gamecube version uses the ambient value, two colors for diffuse and two colors for specular to generate the palette, while the PC version only uses the ambient color and one specular color.
- The PC version uses a high multiplier for specular lighting, which results in an even more “glossy” look than in the Gamecube version, which was already “glossy”. Also, specular lights in the PC version are set up as view-dependent (they move when the camera rotates), while on the Gamecube specular is view-independent (stays in the same place regardless of camera rotation).
- The renderer in the PC version ignores built-in vertex colors for object models. A fix for this was introduced in the Mod Loader.
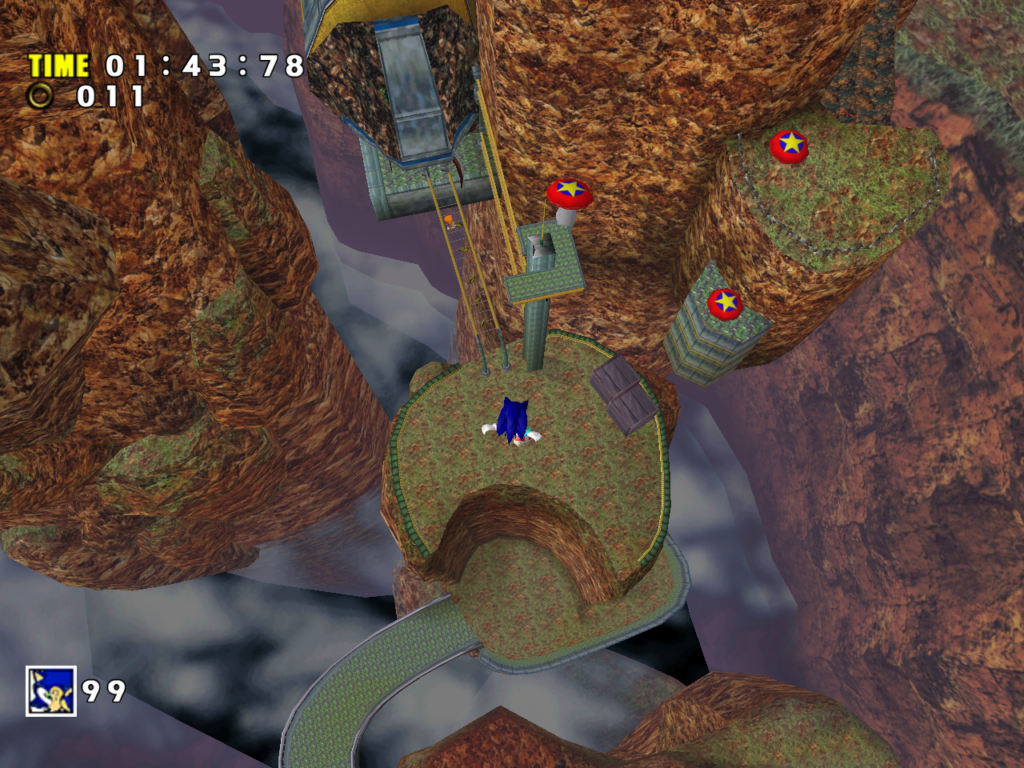
- Although the lighting data format is the same, values for several levels in the PC version were edited to make the lights brighter. This washes out the lighting even further and makes areas look almost fullbright. Simply importing lighting values from the Gamecube version into the PC version (as done by the Gamecube Project mod) even without changing the underlying system makes night lighting in the Mystic Ruins much more convincing.
| Gamecube | PC | PC with Gamecube values |
|---|---|---|
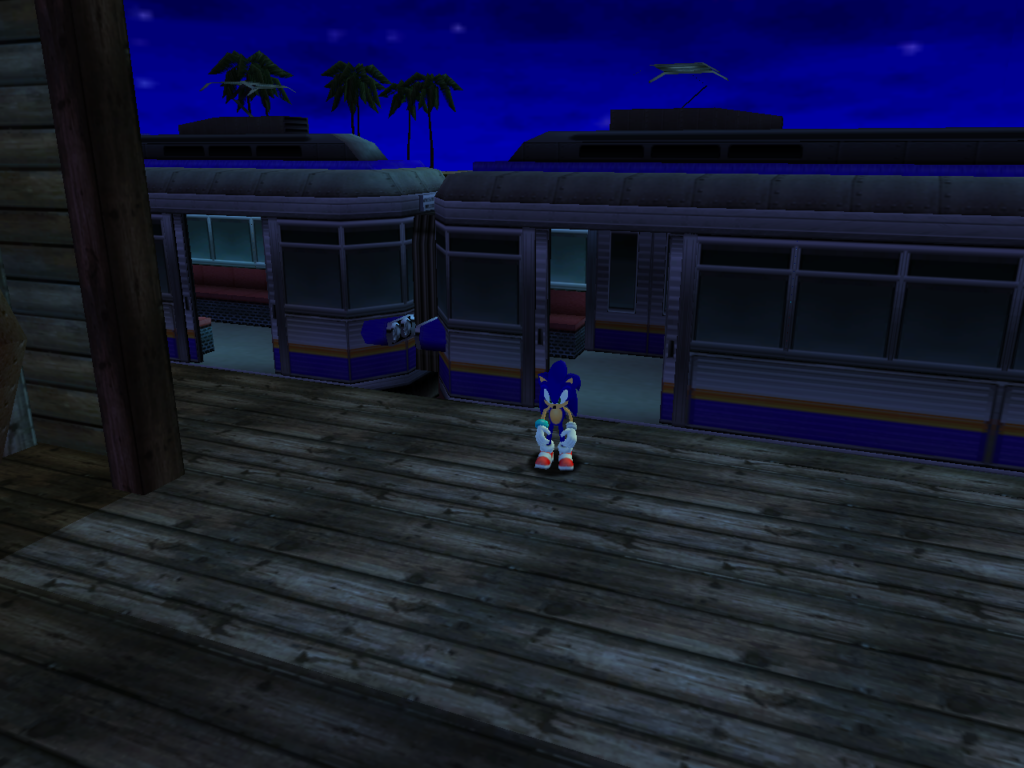 | 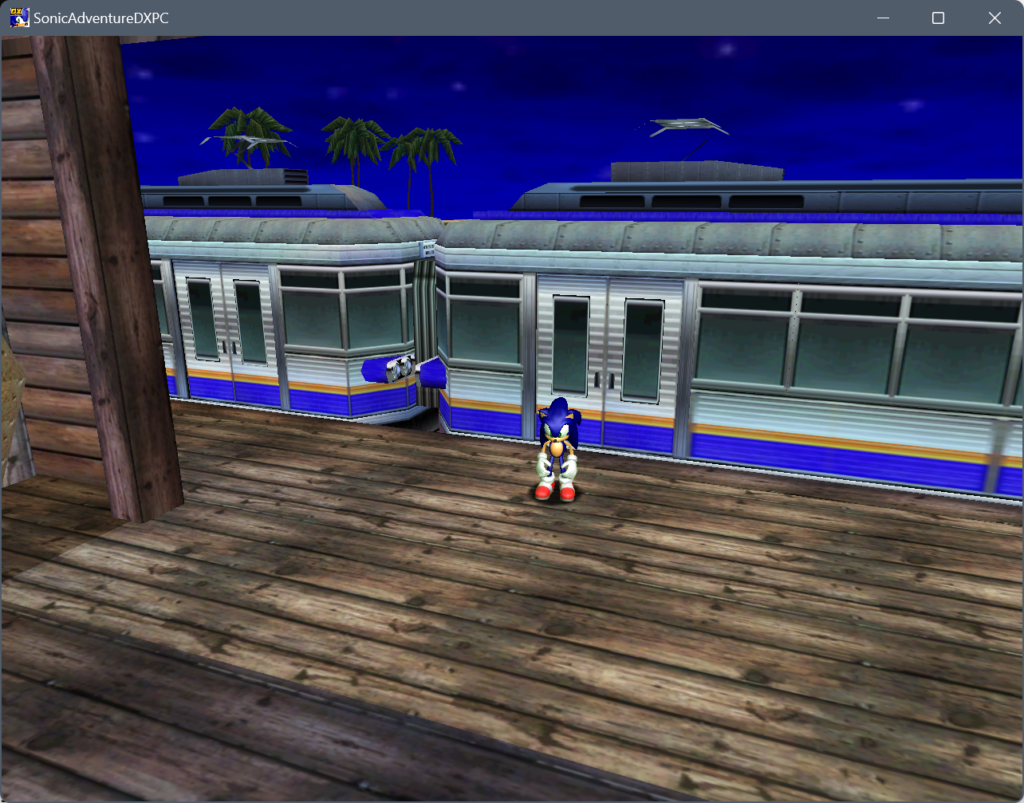 | 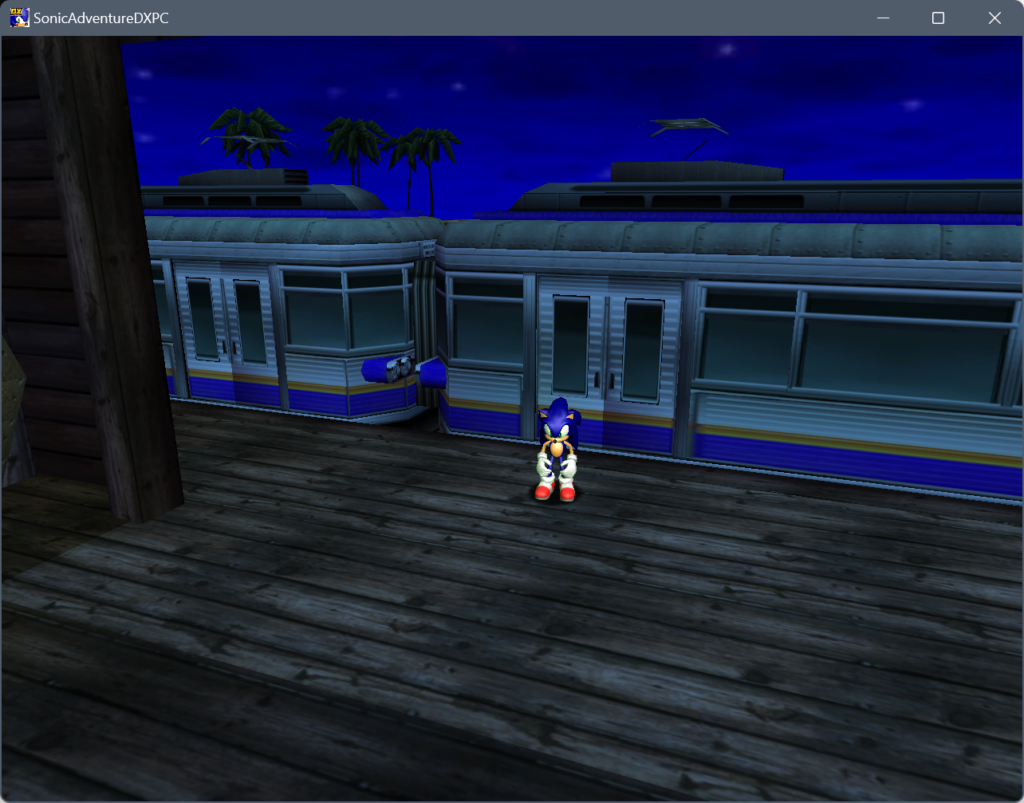 |
SonicFreak94 has made a mod that recreates parts of the Gamecube lighting system in the PC version. At the moment character lighting is not accurate and some stages still look a bit different. I’ve made a fork of this mod in an attempt to improve accuracy, and some stages look closer to the Gamecube version, but others are still different. I’ve also tried to use more values to improve character and object lighting, but since it relies on the same same formulas as the old Direct3D lights, it doesn’t look accurate to the Gamecube version. Still, I think the work that went into the mod is important progress towards fully replicating it in the PC version eventually.


Some special effects
The PC version has some bugs that prevent certain effects from working properly. The Dreamcast and Gamecube versions had bubbles moving inside Chaos’ body, but in the PC version they are static. This is fixed in Dreamcast Conversion and Gamecube Project.
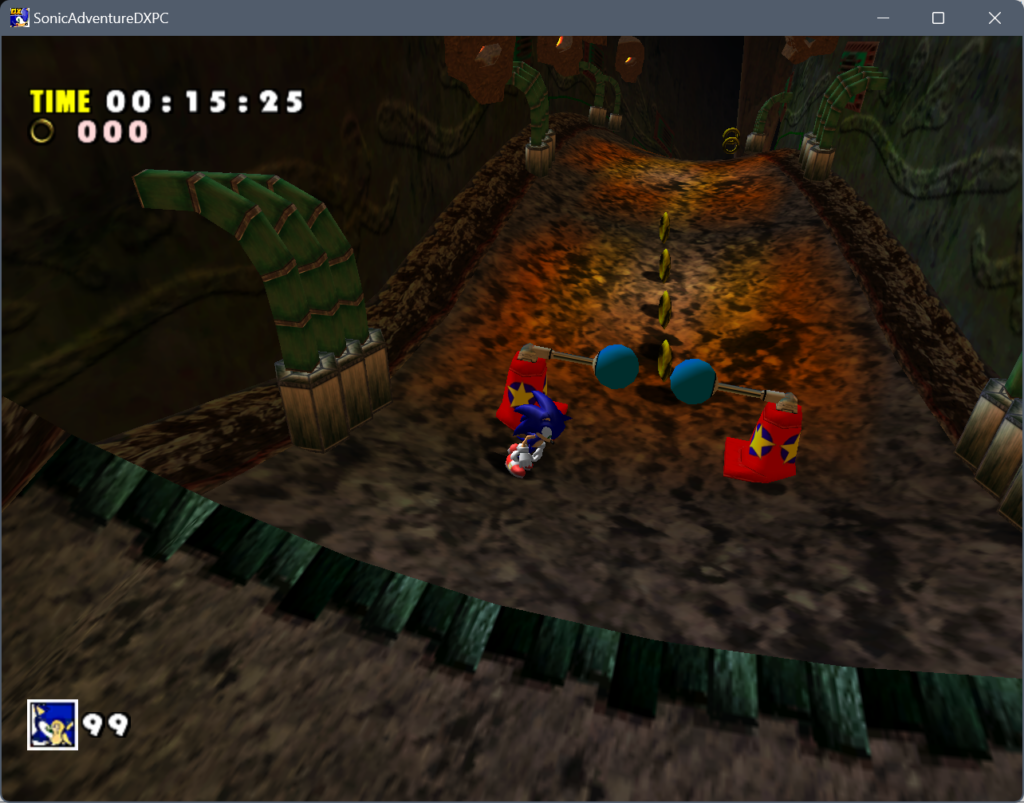
Material colors
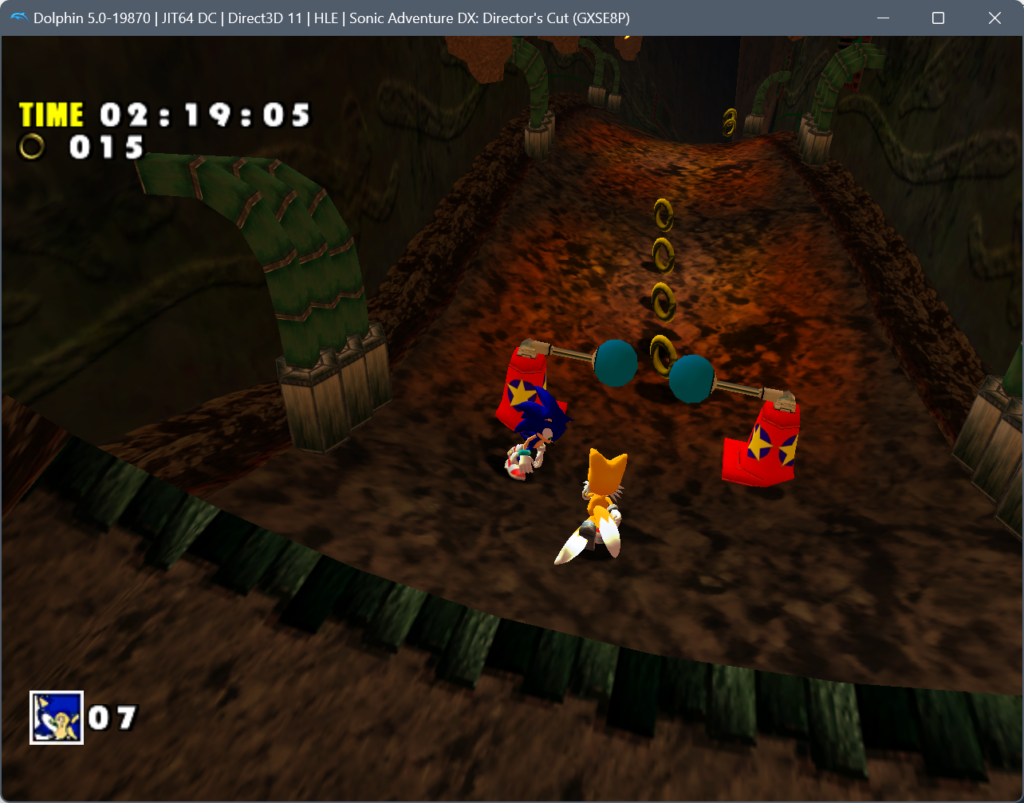
The renderer in the Dreamcast and Gamecube versions ignores material colors in most cases (Chao models use them in the DC version though), while in the PC version it converts material colors to vertex colors. This results in unintended tinting of some models. For example, the clouds in Red Mountain are supposed to be white, but the PC version makes them gray:
| Gamecube | PC |
|---|---|
 |  |
I added a fix to the Mod Loader that makes material colors in all models white, so this issue is no longer relevant.
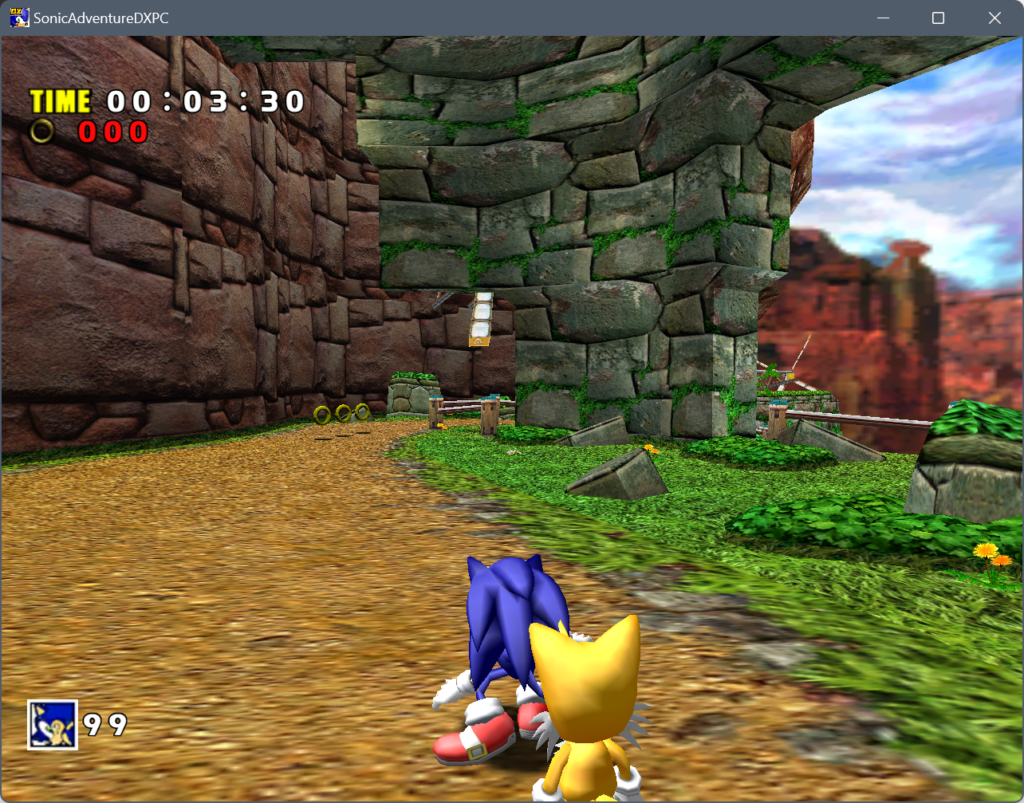
Textures
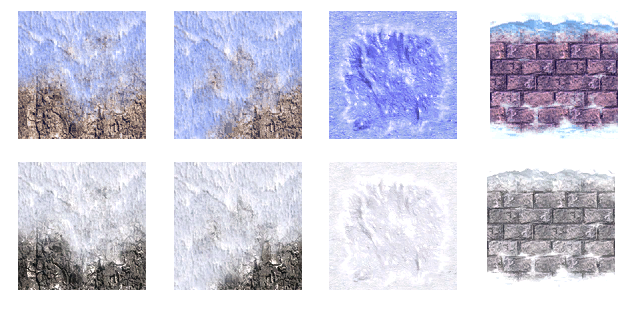
The PC version uses the same texture format as the Dreamcast original, while the Gamecube version uses a different texture format. Both formats have their strengths and weaknesses, which makes some textures look better on GC, although generally the DC version has the sharpest textures and the PC version has the worst quality textures. Here are some examples featured previously on the Dreamcastify blog:


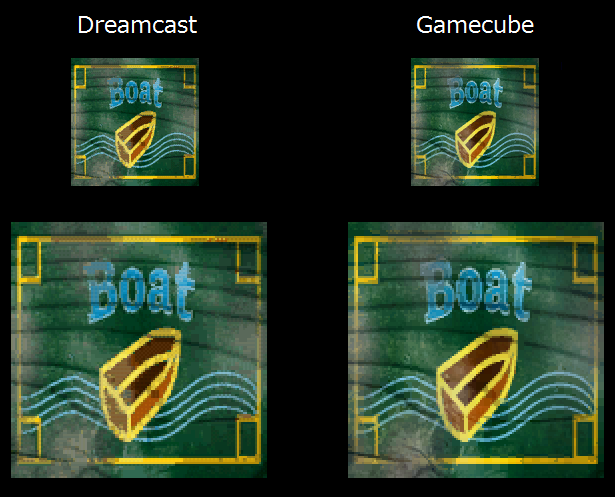
There are some exceptions though, for example here’s a texture from the character select screen:
| Dreamcast | Gamecube | PC |
|---|---|---|
 |  |  |
On the other hand, there are several textures on the Gamecube that are sharper than on the Dreamcast. We could only find a handful of these among thousands, but they do exist:
Unfortunately we can’t pick the best quality version of every texture from all versions because many textures in SADX were edited or replaced. Sometimes it’s a simple color edit, other times it’s based on the same source material but composed differently, and sometimes it’s a completely different texture. Here are some examples:

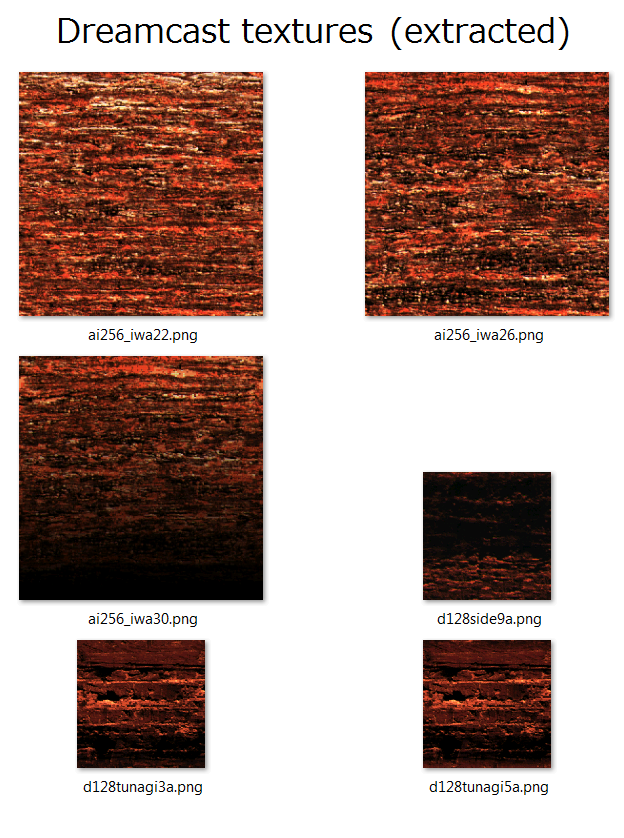 | 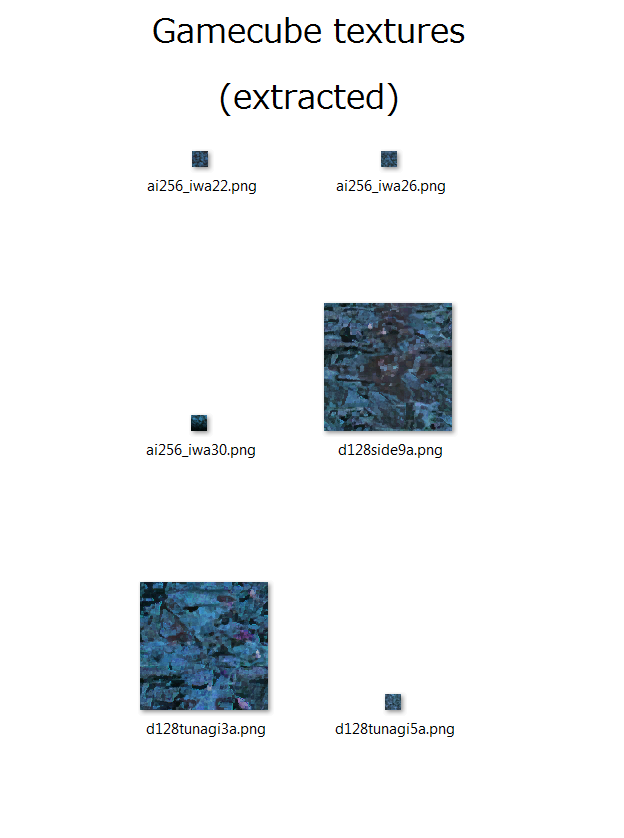 |
The Gamecube Project mod puts back almost all Gamecube textures in the PC version, so if the PC version has a better quality texture there will be a quality regression. However, most of the time Gamecube textures are higher quality than PC textures.
Another difference with textures is lack of mipmaps in the PC version. Although the Mod Loader now generates mipmaps automatically for textures that don’t have them, the original PC port looked pretty terrible without them:
Textures in the Gamecube version have built-in mipmaps so the environments look much smoother in the distance.
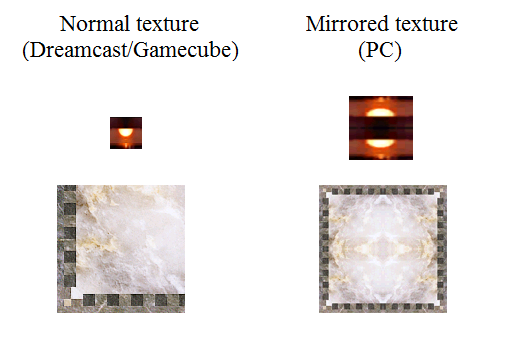
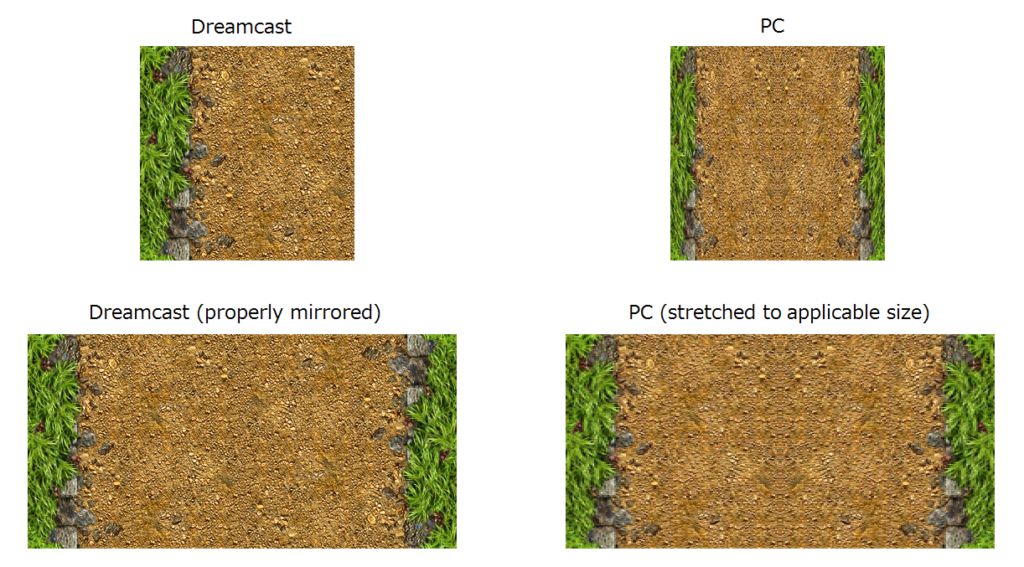
Finally, the PC version introduces mirroring for some textures instead of relying on models’ UVs and material flags, which reduces texture resolution. The Dreamcast and Gamecube versions don’t have this, so their textures are higher quality.
Levels and models
Although they look similar enough to be mistaken as identical, many levels and models in the Gamecube version are different from the PC version as far as their data goes. There are three main reasons for these differences:
- Models that use mirrored textures have had their UVs and material flags adjusted in the PC version.
- Some levels have a different model order, and sometimes the PC version has extra models in the level. Most of the time this has to do with the addition of the detail (clip) setting in the PC version, which is used to make certain items invisible to improve performance. There are also other adjustments related to transparency sorting, which was possibly different on the Gamecube.
- There were some texture ID bugs in the Dreamcast and Gamecube versions which the PC version fixed. For example, E-102 Gamma’s Laser Blaster upgrade in Egg Carrier’s water reservoir room was changed to use correct textures.
While points 2 and 3 are fine to leave as-is, models in the PC version need to be patched to look correct with Gamecube textures. This is one of the things the Gamecube Project mod does.
Menus, fonts and branding
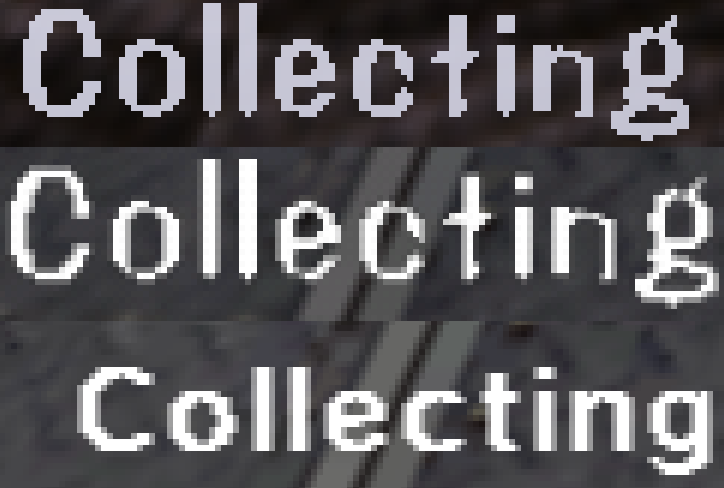
The Gamecube version uses the same subtitle font as the Dreamcast version (though it draws a bit differently), while the PC version switches to a different font:
The Pause menu has a controller configuration section on PC, which the Gamecube version doesn’t have. The quit confirmation prompt only responds to the A button on the Gamecube, while on PC both A and Start buttons can be used.
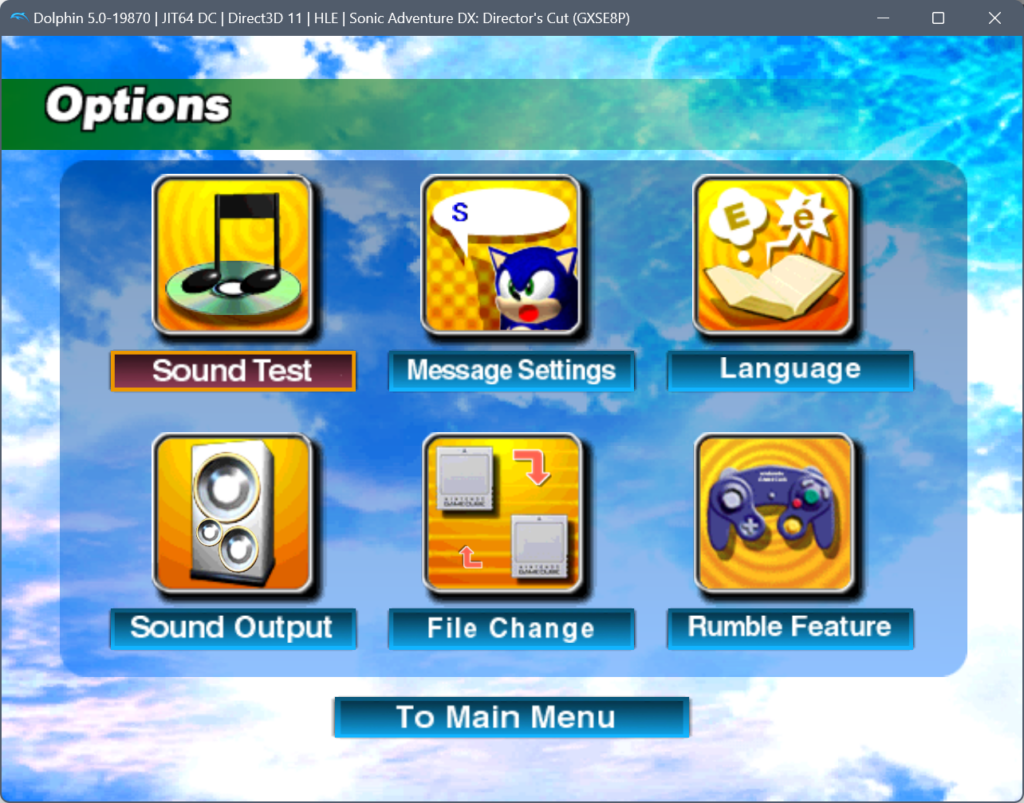
The Gamecube version has Nintendo copyright text on the title screen and images of the Gamecube controller and buttons in menu screens, while the PC version has keyboard images. The save icon in the Options menu is also different, and the arrows have a bouncing animation on the Gamecube. The Gamecube Project mod restores the save icon animation, controller images and button prompts, as well as the copyright text (at 640×480 only). The fonts will be restored at some point in the future.
| Gamecube | PC |
|---|---|
 | 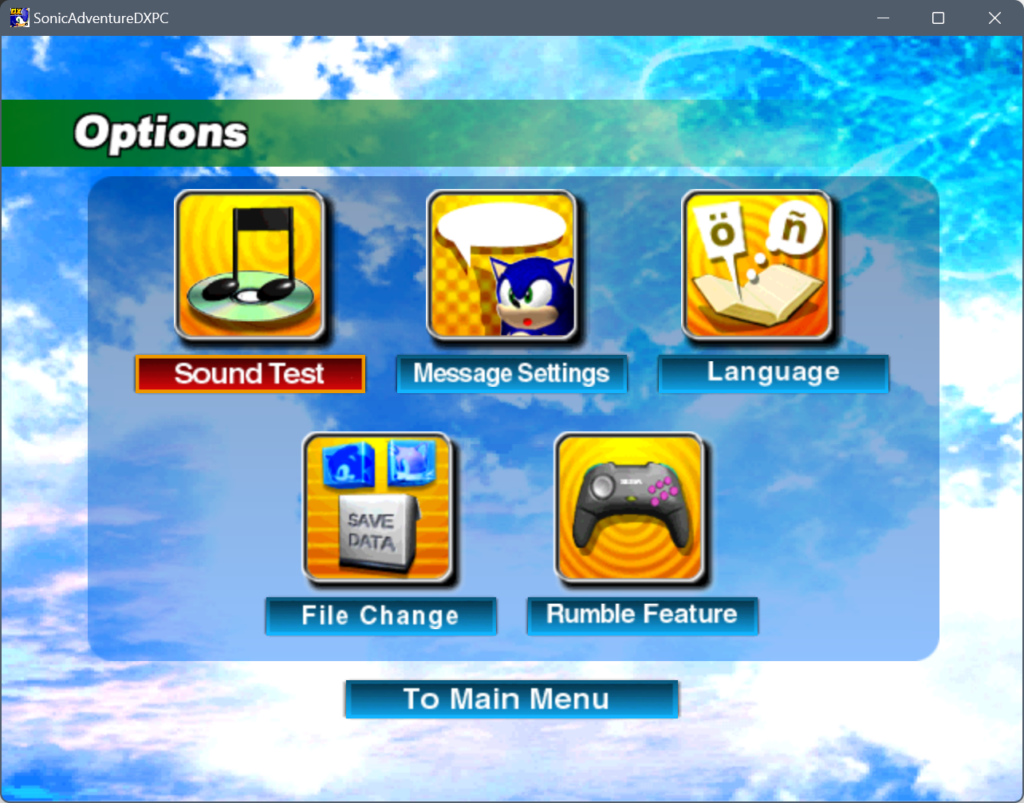 |
Chao
The Gamecube version has GBA connectivity features that are disabled in the PC version (maybe we’ll try to restore that someday?). The model used by the Chao Transporter/Name Machine and its textures were changed in the PC version to remove references to Chao Adventure and GBA-related branding. The PC version also removes the Party Race option in Chao Race, so your Chao can only compete against CPU opponents and not against each other. This is something I’d like to tackle in the Gamecube Project mod and/or Dreamcast Conversion someday.
Sounds, music and voices
The Gamecube version uses ADX music and voices, while the PC version uses WMA music and voices, which are lower quality. This is no longer an issue because the Mod Loader implements ADX support through the BASS library, and you can simply use the ADX Audio mod to get the best quality music and voices.
For sound effects it’s a lot more complicated. The Gamecube version uses a sequenced sound system resembling that of the Dreamcast version. It uses similar data structures and can have DSP effects, although its capabilities are largely unknown at the moment. The PC version doesn’t have anything like that, and uses simple WAV sound effects packed into DAT archives. Although I’ve done some work on getting data out of Gamecube soundbanks, getting them to work in the PC version isn’t feasible at the moment. However, if we figure out enough about the format, we may be able to convert (or record) sequenced effects to regular WAV files and use them in the PC version, like the Sound Overhaul mod does.
Also, the Gamecube version uses Dolby Pro Logic II for 3D audio, while the PC version uses DirectSound3D (the original Dreamcast version used QSound, a binaural 3D effect). While we may not be able to make it identical to either version, 3D sound implemented in the Mod Loader using the BASS audio library is a good alternative.
Fog
The PC version uses Direct3D fog formulas, and all stages are set up to use linear fog. In many areas the fog starts too close to the camera so it washes out details, and the game looks better with fog disabled or adjusted to use longer distances.
The Gamecube version uses different fog modes (linear mode, two exponential modes and two “backwards” exponential modes). The most common fog formulas used by stages in the Gamecube version are linear and “backwards” exponential. Since the exponential formulas are different in Direct3D (and the game uses linear anyway), fog calculation is completely different. In addition, we haven’t checked yet whether fog distances are different between versions (they probably are).
There are several ways to address these differences. The most accurate would be to restore original fog data and use Gamecube fog formulas in the GC lighting mod’s shader. Or, like with Dreamcast Conversion, fog distances in the PC version could be tweaked to look similar.
Water effects
This is perhaps the most visible difference between versions. The Gamecube version has multiple water effects. The distortion is the most obvious effect, but there’s more. Let’s have a look at all of them.
First, the distortion of the whole screen when the camera goes underwater. The surface map used for this effect is the texture called ind_2d in the archive OBJ_REGULAR.

When the camera is above water, there is also distortion of things under (and sometimes above) the water level. This effect uses the ind_3d texture in the same archive.

Often the effect applies to stuff that isn’t underwater, which results in an awkward look:
In fact, when the camera is far enough away from the water, the distortion effect is disabled, likely to reduce the occurrence of this issue:
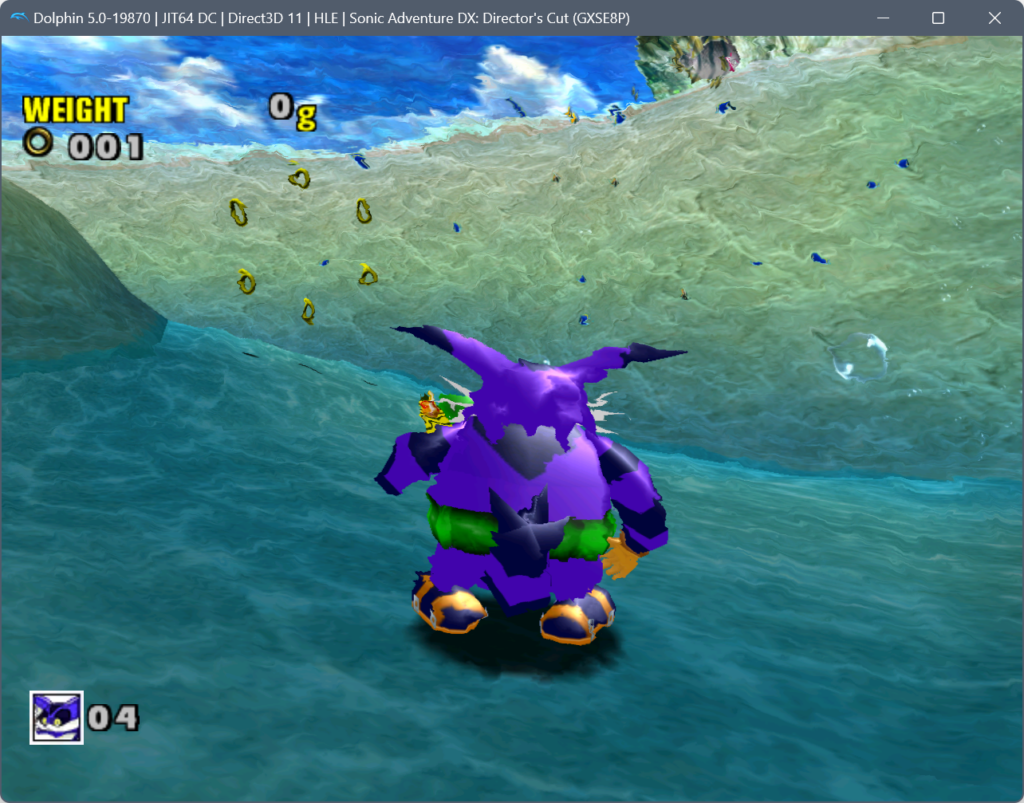
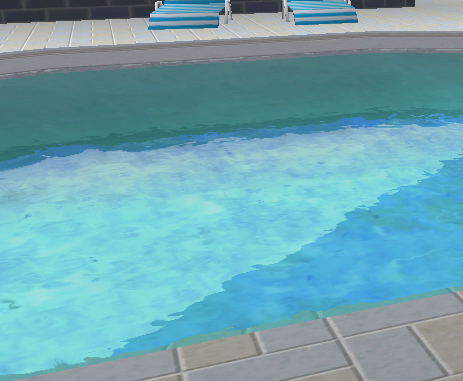
However, even without the distortion effect the water looks much nicer on the Gamecube compared to the PC version. This is because there’s another effect applied to the water surface that the PC version is missing. The salt_tev02 texture included in texture archives for levels that have water is used as a surface map (possibly bump map) to make the water surface lighter or darker.
By replacing this texture with a solid white color we can compare what the water looks like with and without the effect. When we remove the effect, the water starts to resemble the PC version a little bit:
| Gamecube with bump mapping | Gamecube without bump mapping | PC + Gamecube textures (no fog) |
|---|---|---|
Without the effect, the water texture is always bright, which can be problematic because the water uses additive blending. If the water covers other bright objects, it gets a “neon light” or “acid” look sometimes. Thanks to the bump mapping effect, these issues are less noticeable and the water blends much better in the Gamecube version.
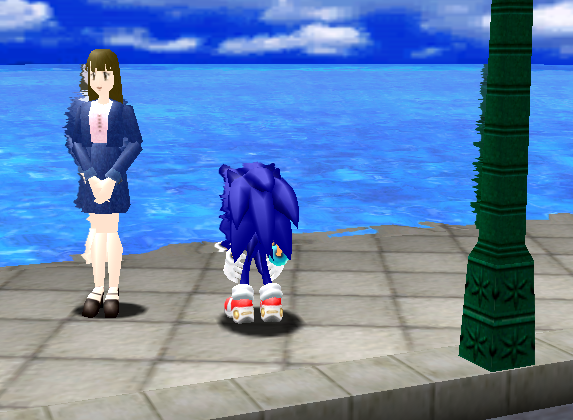
There are other differences as well: the moving pattern of the water surface is a bit more complex on the Gamecube, and the UVs make the water surface texture appear larger than on the PC version. Also, fog makes the water much brighter on PC, so I disabled it for the sake of comparison.
It should be possible to restore the zoomed-in look and movement patterns in the PC version, and depending on how the surface map is done on GC, it may also be possible to apply it as a bump map to make a similar looking effect on PC. Maybe you’ll see that in the mod eventually. Also, the distortion effect could be replicated on PC via shaders, possibly even without the artifacts that can be seen with the Gamecube implementation.
That’s all for now. I’ll post more findings on Gamecube stuff when I get to work on it next time.